
Flooring Seam Placement: Where Seams Belong and Fail.
Flooring seam placement decides whether an installation lasts or fails. Get seams out of the main path of travel and into the places nobody notices.

Amruta Naik
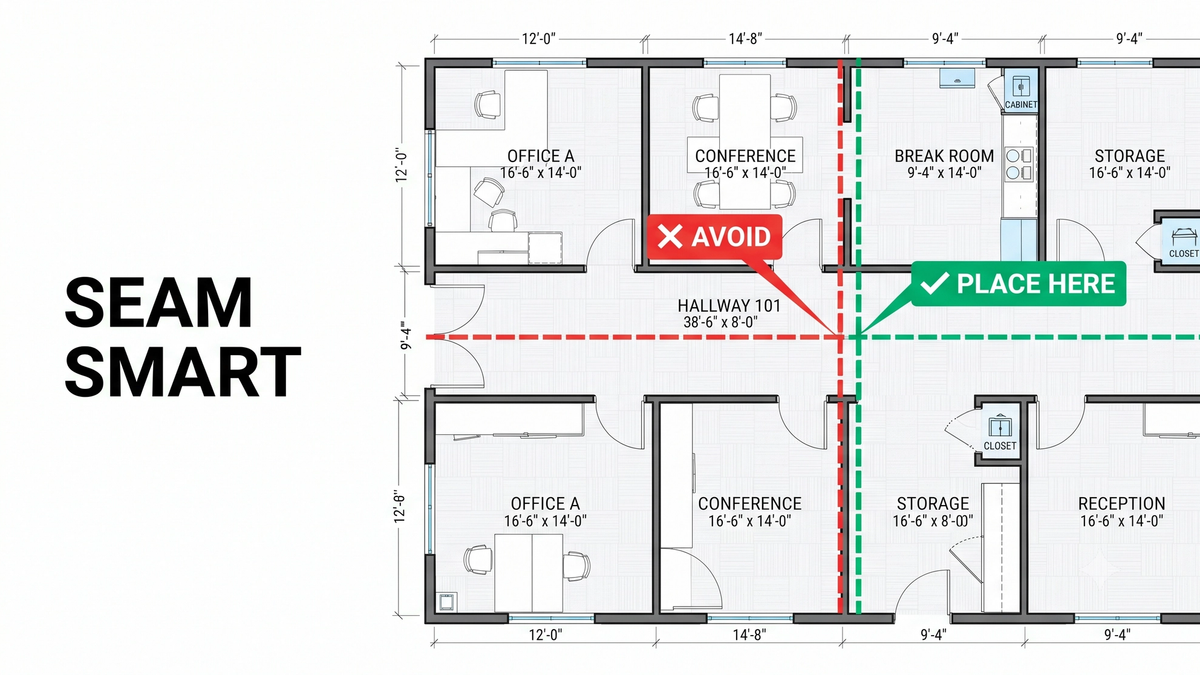
A flooring seam looks like a small detail on paper. On the finished floor it decides whether the installation looks clean for ten years or gets pointed at during the first walkthrough. Put a seam in the main path of travel down a corridor and it wears out faster, collects dirt, opens up, and becomes highly visible. Every one of those outcomes turns into a callback, an unhappy client, and a cost your bid never planned to absorb. Put the same seam tight against a wall, under a cabinet, inside a closet, behind a door, or under a transition strip, and it disappears for the life of the floor. Same seam. Completely different economics.
That is the fundamental point contractors underestimate when they treat flooring seam placement as a field decision made on install day. It is not a field decision. It is an estimating and planning decision that starts when the takeoff opens the floor plan. Roll width, product size, traffic patterns, and material direction all decide where seams have to fall long before an installer unrolls the first sheet. Skip that planning in the estimate and either the field installer improvises (usually toward whatever is easiest, not toward longevity), or the material order comes up short of what the correct seam layout actually needed.
This guide walks through why seam placement matters, the high-traffic zones where seams fail, the low-visibility zones where seams belong, industry-specific considerations for healthcare, schools, hotels, and offices, and how a disciplined takeoff plans seams before install day instead of after.
If you are pricing a commercial flooring set right now and the corridor and lobby seams are keeping you up, upload your plans and get a fast takeoff quote.
Why Flooring Seam Placement Matters More Than You Think
Flooring seam placement is the deliberate positioning of joints in sheet vinyl, broadloom carpet, LVT, and other resilient flooring so seams land in low-traffic, low-visibility zones and stay out of main paths of travel, doorways, and high-turning areas. Unicalibre Estimating plans seam locations during the takeoff itself, using roll widths, product dimensions, room geometry, and traffic patterns, and every deliverable is peer-reviewed before it goes out. The result is a bid that reflects the seam layout the field will actually install, not a square-footage number that ignores where joints will fall.
Four things go wrong when seams end up in the wrong place. Durability drops, because seams in high-traffic areas wear faster and can open prematurely. Appearance suffers, because visible seams create an unprofessional look and undermine the finished space. Hygiene degrades, because seams collect dirt, moisture, and bacteria if they are not placed and welded correctly. And cost rises, because poor seam placement leads to early failures, repairs, and replacement costs that the original bid never priced. Every one of those consequences shows up after handover, when there is no margin left to absorb them.
A complete deliverable prevents that. Unicalibre Estimating provides peer-reviewed flooring quantity takeoffs delivered in native software formats including MeasureSquare, RFMS, Bluebeam, PlanSwift, Callidus, and Stack, with a BOQ tied to a proposed seam layout, marked-up plans showing seam locations, scope notes flagging high-traffic zones and material direction, a material summary that reflects the real roll and product usage, and a deliverable your team can import and adjust without re-entry.
Request a risk-free pilot takeoff on a corridor-heavy or lobby-heavy set and see what a planned seam layout looks like on the marked-up plans.
The Zones Where Seams Fail
The rule is simple. Any place where people walk, roll, turn, or accumulate is the wrong place for a seam. On a commercial floor, that includes far more than most estimators think about.
Seams should be kept out of the main paths of travel, the middle of corridors and hallways, doorways and thresholds, the area in front of elevators, entry and exit areas, and anywhere under rolling loads and heavy carts. They should also stay out of queuing areas like reception desks and counters, in front of fixtures such as sinks, toilets, and urinals, at intersections and crossroads where paths meet, in high-turning areas where sharp wheel movements twist the seam, and near expansion or movement joints where the assembly is already working under stress.
Every one of those zones is a place a seam will be seen, walked on, rolled over, or stressed. Put a seam there and its service life shortens the day the floor opens.
The Zones Where Seams Belong
The right places for seams are the ones nobody looks at. A disciplined seam plan targets six locations wherever the geometry allows.
Along walls, tight against the perimeter where traffic is minimal and the seam sits out of the sightline. Under cabinets, where kitchens, casework, vanities, and built-in furniture hide seams effectively for the life of the install. Inside closets, storage rooms, and pantries, where traffic is low and the seam is rarely visible. Behind doors, where seams are hidden when the door is closed and never exposed to the main flow. In corners, which are low-traffic by nature and keep seams out of the main line of sight. Under transition strips, where a required transition also protects the seam mechanically.
The estimator's job during the takeoff is to figure out how many of those hiding places the room geometry actually provides, how the roll width and product size interact with them, and where seams have no choice but to fall in a compromised location. That last case is the one that requires a conversation with the installer before the material order goes in, not after.
Industry-Specific Considerations
The rules for great seam placement are universal. The stakes on each vertical are not.
Healthcare
Healthcare is the most demanding vertical for seam placement because seams are part of the infection-control strategy. Minimize seams wherever possible. Keep them out of patient room doorways, corridors, and equipment paths, because rolling stretchers, wheelchairs, and heavy medical carts will find every joint. Use heat-welded seams for sheet vinyl and rubber to eliminate open joints entirely. The best locations are along walls, inside rooms, and under cabinets, where hygiene and traffic converge in the estimator's favor.
Schools and Universities
Avoid seams in corridors, cafeteria lines, and classroom entrances, where continuous foot traffic and rolling loads punish every joint. Place seams in storage rooms, closets, and along walls. Durability matters more than aesthetics in most K-12 and higher-ed work, and the seam plan has to survive heavy foot traffic and rolling load usage every school day.
Hotels and Hospitality
Guest experience is everything, so no visible seams in lobbies or guest rooms. Avoid seams in corridors, elevators, and banquet halls, where guests linger, look down, and notice everything. The best locations are behind doors, inside closets, and under fixed furniture, where the seam disappears completely into the finished space.
Offices and Commercial Buildings
Avoid seams in main walkways, meeting room entrances, and reception areas. Place them along walls, under desks or cabinets, or inside closets. In large open spaces, modular carpet tile is often the smarter product call because it eliminates the seam conversation entirely and reduces long-term maintenance risk. That specification decision is one an estimator can flag during the takeoff, before the bid is locked.
Common Seam Placement Mistakes
Most seam failures trace back to the same handful of habits at estimating time:
- Pricing off square footage without planning seam locations first
- Ignoring roll width and product size when the room dictates where seams have to fall
- Letting broadloom seams land in the middle of corridors or in front of doors
- Skipping installation direction and material grain, which drives visible shading at seams
- Ignoring traffic patterns and turning radii on the floor plan
- Failing to coordinate with cabinets, casework, and fixtures during the takeoff
- Assuming the field installer will figure it out on install day
Pro tip checklist before you lock a flooring order:
- Have I identified the main paths of travel on every level?
- Have I checked roll width and product size against room dimensions?
- Have I planned seams along walls, under cabinets, inside closets, or behind doors wherever the geometry allows?
- Have I used the longest rolls available where they reduce seam count?
- Have I confirmed material direction to avoid visible shading at seams?
- Have I coordinated with other trades (cabinets, casework, fixtures) on their final positions?
- Have I flagged large open areas for potential product substitution (modular tile) if seam risk is high?
- Have I planned welded seams for resilient flooring in wet or clinical areas?
How the Estimating Models Compare on Seam Planning
DIY (owner estimating): Seam planning gets pushed to install day, and installers optimize for speed over longevity. Callbacks show up months later, and the cost is absorbed silently.
In-house estimator: Better if trained in seam planning, but a single set of eyes under deadline pressure often defaults to square footage plus a percentage and leaves the field to sort it out.
Per-project outsourcing: Useful for overflow, but a rotating estimator does not know your installers' standards or your GCs' expectations, so seam quality varies bid to bid.
Dedicated FTE estimator: The same estimator every time, planning seams during the takeoff itself in MeasureSquare, RFMS, or Callidus, peer-reviewed before delivery, learning what your installers actually prefer in the field. Most reliable on corridor-heavy hospitality, healthcare, and commercial work, typically at a 50 to 60 percent cost reduction versus a domestic in-house hire.
Request a risk-free pilot takeoff with a planned seam layout and see the difference against a raw square-footage quote.
What Changes in the Real World
The pattern repeats across project types where high-traffic zones dominate the plan.
A flooring subcontractor in Texas was bidding hotel corridors and letting broadloom seams fall wherever the roll width defaulted them. A pre-install seam plan that repositioned seams to sightline-hidden locations and used longer rolls where available reduced visible-seam callbacks meaningfully and protected an estimated 5 to 10 percent of margin per phase that would have gone to remediation.
A commercial flooring contractor in Phoenix bidding a school renovation had seams landing across the main cafeteria queuing line and the classroom entrance thresholds. Repositioning seams to along-wall and closet-interior locations during the takeoff cut wear-related repair work close to zero across the first year and protected an estimated 5 to 10 percent of the labor line.
A flooring firm in Ontario bidding a healthcare corridor renovation had sheet vinyl seams planned in wheelchair and stretcher paths. Moving those seams tight to the walls and heat welding them where corridor geometry forced compromises avoided infection-control complaints and repair mobilizations that a bid margin cannot survive.
Same lesson every time: plan the seams in the takeoff, not on install day. See how a dedicated estimator helps you bid more commercial work with seam layouts your field team will thank you for.
What to Send and What You Get Back
A seam-aware flooring takeoff does not require a perfect package. It requires the right inputs.
What you send: architectural plans, the finish schedule and finish legend, the flooring product spec and manufacturer data sheets if available, any addenda, planned cabinet and casework locations, expected traffic patterns or department layouts, and your preferred brands or labor rates.
What you get back: a BOQ or Excel breakdown organized by area and material with seam planning reflected in the quantities, marked-up plans showing proposed seam locations along walls, under cabinets, behind doors, and under transitions, scope notes flagging high-traffic zones where seams had to be compromised, a material summary that reflects real roll and product usage, and native software files in your platform (MeasureSquare, RFMS, Bluebeam, PlanSwift, Callidus, or Stack) so your team can import and adjust without re-entry.
Timeline: standard turnaround is typically 24 to 48 hours for most trade packages, with same-day rush available when the deadline is closing. Communication runs over email, phone, and your preferred PM tools, and addenda are tracked as they land.
Want the seam-planning checklist your team can run before every commercial takeoff? Download the checklist.
Frequently Asked Questions
What is flooring seam placement and why does it matter?
Flooring seam placement is the deliberate positioning of joints in sheet vinyl, broadloom carpet, LVT, and other resilient flooring so seams land in low-traffic, low-visibility zones. It matters because seams in main paths of travel wear out faster, collect dirt, open up, and become highly visible, driving callbacks, repair costs, and shortened service life. A planned seam layout extends floor life and protects margin.
Where should flooring seams be avoided in a commercial building?
Flooring seams should be avoided in main paths of travel, the middle of corridors and hallways, doorways and thresholds, in front of elevators, entry and exit areas, under rolling loads and heavy carts, queuing areas, in front of fixtures like sinks and toilets, at intersections and crossroads, in high-turning areas, and near expansion or movement joints. These zones stress and expose seams the most.
Where are the best places to put flooring seams?
The best places for flooring seams are along walls, under cabinets, inside closets and storage rooms, behind doors, in corners, and under transition strips. These locations are low-traffic, low-visibility, or physically protected, so the seam is neither stressed nor exposed. A disciplined takeoff plans as many seams as possible into these hidden locations before the material order is placed.
How is seam placement different in healthcare compared to other commercial flooring?
Seam placement in healthcare is stricter because seams are part of the infection-control strategy. Hospitals minimize seams wherever possible, avoid them in patient room doorways, corridors, and equipment paths, and use heat-welded seams for sheet vinyl and rubber to eliminate open joints. The best locations are along walls, inside rooms, and under cabinets, where hygiene, traffic, and durability requirements converge in the estimator's favor.
Can an outsourced estimator plan seam layouts in my flooring takeoff software?
Yes. Unicalibre Estimating works natively in MeasureSquare, RFMS, Bluebeam, PlanSwift, Callidus, and Stack, and every takeoff includes seam planning as part of the deliverable, not as an upgrade. Marked-up plans show proposed seam locations, scope notes flag compromises where geometry forced them, and the material summary reflects real roll and product usage. Every takeoff is peer-reviewed before delivery.
Plan the Seams in the Takeoff, Not on Install Day
A seam in the wrong place will always be seen, felt, and eventually will fail. A seam in the right place lasts for years unnoticed. The difference is not the installer's skill or the product's quality. It is whether the seam plan was thought through during the takeoff, using room geometry, roll width, traffic patterns, and material direction, or whether it was left to the field to figure out on install day. One approach protects margin for the life of the floor. The other quietly bleeds it through callbacks, repairs, and premature replacement.
Bid season does not wait, and corridor-heavy hospitality, healthcare, and school projects are exactly where sloppy seam plans cost the most. A disciplined, peer-reviewed process puts seams tight to walls, under cabinets, inside closets, and behind doors before the material order is placed, and flags every location where geometry forced a compromise so your field team can plan for it. Plan smart, place smart, install with care.
Book a call and send your plans for turnaround and pricing. Get seam placement right at the takeoff, and stop letting a joint decide your callback rate.