
The Estimator's Guide to Reading Finish Schedules
Learn how to read a finish schedule before you measure. It is the foundation of every accurate commercial flooring estimate, and most bids skip it.

Amruta Naik
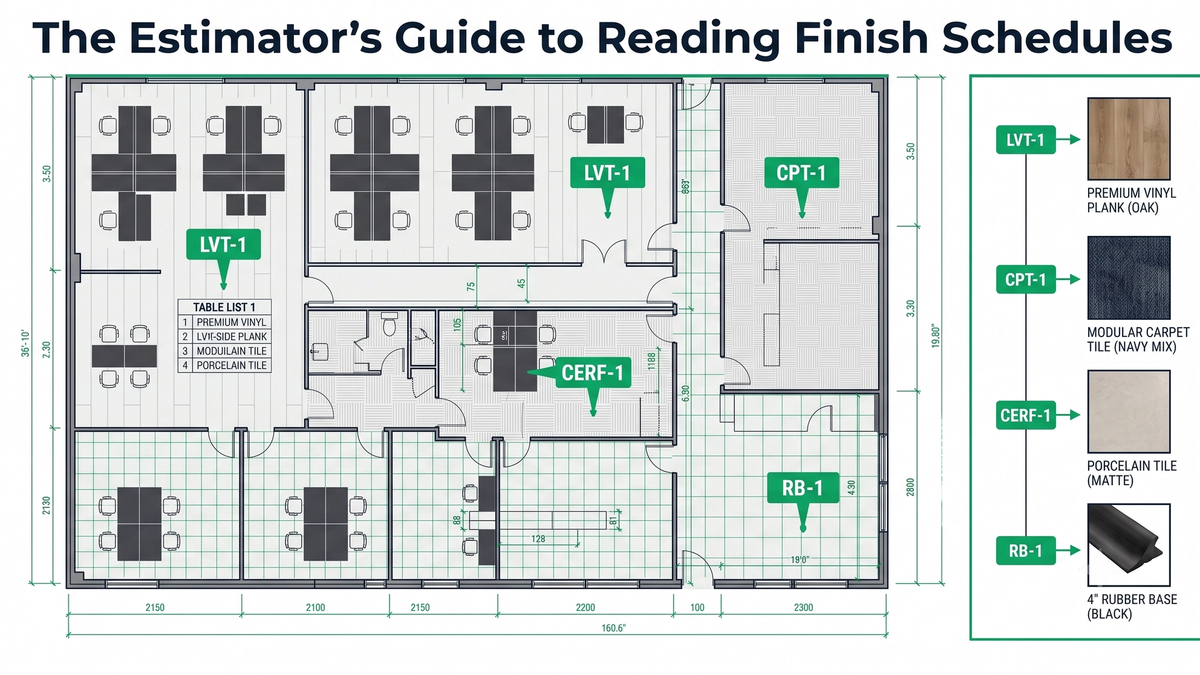
The estimators who lose the most money are the ones who open the floor plan first. They measure 12,000 square feet of sheet vinyl, feel good about the number, and move on. Then construction starts and the project surfaces the flash cove base, the heat-welded seams, the waterproofing in the wet rooms, the stainless steel transitions, and the rubber wall base in the corridors. None of it was on the floor plan. All of it was in the finish schedule. That gap is where margin quietly walks out the door, and it is why learning how to read a finish schedule is the single highest-leverage habit in commercial flooring estimating.
The finish schedule is not a table of abbreviations. It is the instruction manual for the entire flooring scope. It tells you what materials are installed, where they live, and what specialty conditions follow them. Twenty minutes spent inside it before you touch your takeoff software can save hours of rework and prevent thousands of dollars of missed scope after award. Professional estimators read the finish schedule first. Junior estimators reach for the floor plan and pay for it later.
This guide walks through how to read a finish schedule the way disciplined estimators read it: codes, legend, verification, base, walls, ceilings, responsibility matrix, notes, and cross-references. Done well, the takeoff that follows is faster, tighter, and far less likely to bleed margin in the field.
If your bid is due and the set is heavy with finish codes you do not have time to chase down, upload your plans and get a fast takeoff quote.
What Is a Finish Schedule and Why Does It Matter?
A finish schedule is an architectural document that identifies the floor, base, wall, and ceiling finishes for every room or area on a project, along with finish codes, material descriptions, colors, manufacturer references, and special installation notes. Unicalibre Estimating treats the finish schedule as the foundation of every commercial flooring takeoff, cross-referenced against the legend, elevations, responsibility matrix, and specifications before a single quantity is measured. The result is a bid that captures full scope, not just floor area.
The reason this matters is the math of omission. Commercial projects rarely use one flooring material throughout. A single project can include carpet tile, broadloom carpet, sheet vinyl, LVT, ceramic tile, rubber, epoxy, and polished concrete, and each one carries its own installation method, waste factor, adhesive, labor productivity, and accessories. Treat them all the same and the bid is wrong before it is submitted. Read the finish schedule properly and every material lands in the takeoff with the correct method behind it.
A complete deliverable closes that gap. Unicalibre Estimating provides peer-reviewed flooring quantity takeoffs delivered in native software formats including MeasureSquare, RFMS, Bluebeam, PlanSwift, Callidus, and Stack, with a BOQ broken out by area and finish code, marked-up plans, scope notes flagging waterproofing and specialty conditions, a material summary, and a deliverable your team can import and adjust without re-entry.
Request a risk-free pilot takeoff on a real set and see what a finish-schedule-first process catches that a floor-plan-first process misses.
How to Read a Finish Schedule the Right Way
The sequence below is how a disciplined commercial flooring takeoff actually starts. Each step exists because skipping it has a real cost.
Step 1: Decode the Finish Codes
Every finish schedule uses abbreviated material codes: CPT for carpet tile, LVT for luxury vinyl tile, SV for sheet vinyl, CERF for ceramic floor tile, CERW for ceramic wall tile, RB for rubber base, VCB for vinyl cove base, and so on. Those codes appear throughout the architectural drawings. Before measuring anything, cross-reference every code with the finish legend so you know exactly what material has been specified and where it is installed.
Step 2: Read the Finish Legend
The finish legend translates each code into a real product. Manufacturer, product series, color, pattern, tile size, thickness, finish, installation direction. A finish schedule might call out LVT-2, and the legend tells you it is a 6 inch by 48 inch glue-down luxury vinyl plank installed in a staggered pattern. Those details directly affect labor, waste, and installation planning, so the legend is not optional reading.
Step 3: Verify Every Flooring Material
Once you know what each code means, verify every material that appears in the schedule. Carpet tile, broadloom, sheet vinyl, LVT, ceramic, rubber, epoxy, polished concrete: each one has different waste behavior, different adhesives, different labor rates, and different accessories. Never assume any two flooring materials estimate the same way, even when they sit side by side in the same room.
Step 4: Verify the Product on the Manufacturer's Website
The finish schedule names the product. The manufacturer's technical data sheet tells you how to estimate it. Before pricing, verify the form (rolls, planks, tiles, slabs), the product dimensions, the carton coverage and pieces per carton, available roll widths, recommended installation direction, required adhesives and accessories, and available trim, transition, and molding pieces.
Why this matters in practice: if you do not know whether a sheet vinyl is available in 6 foot or 12 foot rolls, your waste calculation can swing meaningfully on a corridor-heavy project. If you do not know that a carpet tile carton covers 72 square feet, you cannot order full cartons accurately. The same logic applies to LVP, ceramic tile, and rubber flooring. Professional estimators do not rely on the drawings alone. They verify the product before pricing it.
Step 5: Do Not Overlook the Base
The finish schedule identifies the base type: rubber, vinyl cove, flash cove, ceramic tile base, wood base. That is the start, not the finish. You also need base height, color, and every accessory: inside corners, outside corners, end caps, and cove sticks for flash cove. On a large commercial project these small components add up fast and routinely get skipped when the takeoff stops at floor finish.
Step 6: Review the Wall Finishes
Many flooring estimators measure the floor and stop. The finish schedule routinely includes ceramic wall tile, accent tile, wainscot, shower walls, backsplashes, and feature walls. These are identified in the schedule and detailed further in the interior elevations. Read both documents together. The wall scope lives in the gap between them.
Step 7: Do Not Ignore Ceiling Finishes
Most commercial ceilings are acoustical tile, but not all. Healthcare, hospitality, and commercial kitchens often specify ceramic tile ceilings, decorative wood ceilings, metal ceilings, and moisture-resistant systems. If any of that falls inside your trade, the finish schedule will say so, and the takeoff has to capture it.
Step 8: Study the Responsibility Matrix
Many projects include a responsibility matrix that identifies who supplies and installs each material: flooring contractor supply and install, owner-furnished and contractor-installed, owner-supplied accessories, GC-installed entrance mats, and so on. Skip this document and you risk pricing materials that are not your scope, or worse, missing materials that are. It belongs in the same review pass as the finish schedule itself.
Step 9: Read Every Architectural Note
The most expensive information in any drawing set often lives in the notes. Waterproofing, crack isolation membranes, floor preparation, moisture mitigation, heat-welded seams, transition strips, Schluter profiles, expansion joints, special adhesives, attic stock. Any one of these can blow a hole in the margin if it slips through. Read the notes line by line, and cross-reference them against the spec.
Step 10: Cross-Reference the Entire Drawing Set
A finish schedule is never read alone. Compare it against the floor plans, interior elevations, enlarged plans, reflected ceiling plans, architectural details, and specifications. Critical details often appear on only one sheet, and the job of a disciplined estimator is to connect them across the set before measuring.
Step 11: Think Like an Installer
The last step is the one that separates an average estimator from a great one: read the schedule with installation knowledge in mind. Do not just ask what material goes here. Ask how it will be installed, whether it needs waterproofing, whether it needs floor prep, whether it needs transitions, whether it increases cutting, whether the pattern adds waste, whether it needs specialty trims. When you understand how the installer will complete the work, the takeoff becomes both more complete and more accurate.
Common Finish Schedule Mistakes
Most missed scope on commercial flooring projects traces back to the same handful of habits:
- Starting the takeoff before reading the finish schedule
- Ignoring finish codes or skipping the legend
- Missing wall finishes by reading the floor plan alone
- Forgetting base accessories like corners and end caps
- Overlooking waterproofing called out in the schedule and notes
- Ignoring the responsibility matrix
- Not verifying products on the manufacturer's site
Pro tip checklist before you open your takeoff software:
- Have I reviewed every finish code against the legend?
- Have I verified the product on the manufacturer's website?
- Do I know whether it is supplied in rolls, planks, tiles, or slabs?
- Do I know the carton coverage or roll width?
- Have I reviewed floor, base, wall, and ceiling finishes together?
- Have I checked the responsibility matrix?
- Did I review elevations and architectural notes line by line?
- Have I identified waterproofing, transitions, and specialty accessories?
- Do I understand how the installer will actually complete this work?
How the Estimating Models Compare on Finish-Schedule Discipline
DIY (owner estimating): The finish schedule gets a quick glance under deadline pressure, the codes and legend rarely get fully cross-referenced, and missed scope shows up after award.
In-house estimator: Better coverage if trained, but a single set of eyes under bid-day pressure still misses items, and there is no structured second review.
Per-project outsourcing: Useful for overflow, but a rotating estimator does not know your company standards or how your crews actually install, so finish-schedule interpretation varies bid to bid.
Dedicated FTE estimator: The same estimator every time, working a structured finish-schedule-first process, peer-reviewed before delivery, learning what your GCs typically pass through and what your crews need flagged. Most reliable on complex commercial work, typically at a 50 to 60 percent cost reduction versus a domestic in-house hire.
Request a risk-free pilot takeoff on a real commercial set and see how a finish-schedule-first process changes the bid.
What Changes in the Real World
The pattern repeats wherever finish schedules carry scope that the floor plan does not show.
A flooring subcontractor in Texas was bidding healthcare projects off the floor plan and consistently missing flash cove base, heat-welded seams, and waterproofing in the wet rooms. Adding a finish-schedule-first review to the workflow brought the missing scope into the bid where it belonged and protected an estimated 8 to 12 percent of margin that the field would have absorbed.
A commercial flooring contractor in Phoenix kept under-ordering material on multifamily LVT bids because the legend's plank size and installation direction were not being checked. Verifying every product on the manufacturer's site cut material overages and brought waste closer to an honest 5 to 10 percent.
A flooring firm in Ontario bidding a hospitality fit-out had been pricing wall tile only from the floor plan and missing accent bands and wainscot called out in the schedule. Reading the schedule alongside the interior elevations surfaced the full wall scope before the bid went out and avoided a labor miss of an estimated 5 to 10 percent.
Same lesson every time: the finish schedule is the source, the floor plan is the geometry. See how a dedicated estimator helps you bid more commercial work without losing scope along the way.
What to Send and What You Get Back
A finish-schedule-first takeoff does not require a perfect package. It requires the right inputs.
What you send: architectural plans, the finish schedule and finish legend, interior elevations, reflected ceiling plans, the door schedule, specifications, any addenda, the responsibility matrix if available, and your preferred brands or labor rates if you have them.
What you get back: a BOQ or Excel breakdown organized by area and finish code, marked-up plans showing floor, base, wall, and ceiling scope per finish code, scope notes flagging waterproofing, transitions, and specialty conditions, a material summary with carton and roll math reconciled to the manufacturer's data, and native software files in your platform (MeasureSquare, RFMS, Bluebeam, PlanSwift, Callidus, or Stack) so your team can import and adjust without re-entry.
Timeline: standard turnaround is typically 24 to 48 hours for most trade packages, with same-day rush available when the deadline is closing. Communication runs over email, phone, and your preferred PM tools, and addenda are tracked as they land.
Want the pre-bid review your team can run on every finish schedule? Download the checklist.
Frequently Asked Questions
What is a finish schedule in commercial flooring?
A finish schedule is an architectural document that identifies the floor, base, wall, and ceiling finishes for every room or area on a commercial project, along with finish codes, material descriptions, colors, manufacturer references, and special installation notes. It is the foundation of an accurate flooring takeoff because it captures scope that the floor plan alone does not show.
Why should an estimator read the finish schedule before the floor plan?
Reading the finish schedule first prevents missed scope. The floor plan shows geometry. The finish schedule identifies materials, codes, base, walls, ceilings, manufacturers, and installation notes that drive labor, waste, and accessories. Starting with the floor plan and ignoring the schedule is the single most common cause of margin loss in commercial flooring estimating.
What is the difference between a finish schedule and a finish legend?
The finish schedule identifies which finish codes apply to which rooms or areas. The finish legend translates each code into a specific product, including manufacturer, product series, color, pattern, tile size, thickness, finish, and installation direction. Both documents are required to read a finish schedule correctly and produce an accurate flooring takeoff.
What scope items are most often missed when an estimator skips the finish schedule?
The most commonly missed items are waterproofing, flash cove base and base accessories, heat-welded seams, wall tile and wainscot, ceiling finishes in specialty areas, transition strips and Schluter profiles, and special installation notes like attic stock and moisture mitigation. All of these are routinely identified in the finish schedule and missed when the takeoff starts from the floor plan.
Can an outsourced estimator follow a finish-schedule-first process in my software?
Yes. Unicalibre Estimating works natively in MeasureSquare, RFMS, Bluebeam, PlanSwift, Callidus, and Stack, and every takeoff starts with a structured finish-schedule and legend review before any quantity is measured. Every deliverable is peer-reviewed against the schedule, the responsibility matrix, and the architectural notes before it goes out the door.
The Finish Schedule Decides the Bid
Great commercial flooring estimates do not start in the takeoff software. They start in the finish schedule. Every code reviewed against the legend, every product verified on the manufacturer's site, every base accessory captured, every wall and ceiling finish cross-referenced against the elevations, every responsibility-matrix line confirmed, every architectural note read in full. That is what separates a bid that holds its margin from one that absorbs scope it never priced.
Bid season does not wait, and the complex commercial sets where finish schedules carry the most scope are exactly where rushed takeoffs cost the most. A disciplined, peer-reviewed process puts every material, accessory, and special condition into the bid before it leaves your desk. That discipline compounds across every job that follows.
Book a call and send your plans for turnaround and pricing. Read the schedule first. Win the bid for the right reasons.